Distributing Custom Microsoft Edge (Chromium) Extensions in a Highly Regulated Enterprise
Microsoft decided to base the latest version of Microsoft Edge on Chromium, this results in a much more standards-based browsing experience where Microsoft can innovate in other areas like UI etc.


Microsoft decided to base the latest version of Microsoft Edge on Chromium, this results in a much more standards-based browsing experience where Microsoft can innovate in other areas like UI etc. Chromium brings with it an excellent extensibility model for customers and 3rd parties to extend the browsing experience, these extensions can also be published to the public Microsoft Edge Web Store. In this blog post I would like to explore how we can distribute our custom Microsoft Edge extensions within the Enterprise.
Build & Package a Custom Extension
There are multiple steps to building a Microsoft Edge Extension, in this post I will focus on extension distribution & deployment. Before we can continue, we need a simple extension to deploy. The high-level steps for building & packaging a simple extension are as follows:
- Generate the developer certificate.
- Create the extension manifest.
- Add the JavaScript code.
- Test the extension locally.
- Package for deployment.
1. Generate the developer certificate
If we do not plan to distribute our extension via the Microsoft Edge Web Store, we will need a certificate. This certificate will be used to digitally sign the extensions deployment package (CRX), we would also use this keypair for packaging subsequent extension updates. Once we have this keypair, we are also able to generate the extension's id; this is an important identifier which we will use later in the post.
For our scenario we can create a self-signed certificate with the following steps:
Generate the private key:
> openssl genrsa 2048 | openssl pkcs8 -topk8 -nocrypt -out key.pem
Generating RSA private key, 2048 bit long modulus (2 primes)
.............................................................+++++
........................................................................................................+++++
e is 65537 (0x010001)
Generate the public key:
> openssl rsa -in key.pem -pubout -outform DER | openssl base64 -A
writing RSA key
MIIBIjANBgkqhkiG9w0BAQEFAAOCAQ8AMIIBCgKCAQEAxVF/+SPvFky9yYjTUeXbKJj6r1ZdDxoS+GGnVtYIoRCtwM3Lt1QuIWoG/t8bCNq+J5GJKm9+y5U/keDRtoDPghbCzuysJxMSmkJzb85CK1KFkxBfNAG8oAM3p1d4+jR4tudp0s9Re97OiQOqZNXhiFqQ30g1EJr/+KBe6Wyh+hKr+/9O88YMtnvUzc6595aBHRkhqvsE9x8pNKf29FBppivh/PlEDqyBeCSWYCiJNFHM0gsVIrkUaSE9RPNVSlxn2tZH8pMH1A+dpUT4d6y+nDE9SeAxBCZrG8KMQHGyZR9I6ylnar52M259Y+LUQ/U5LZWhsUsryqd4i5wuWeq5RQIDAQAB
The Microsoft Edge (Chromium) Extension ID:
> openssl rsa -in key.pem -pubout -outform DER | shasum -a 256 | head -c32 | tr 0-9a-f a-p
writing RSA key
gimgeafkohnmpdeopfnpankklbllicfn
If you leverage the Private Key generated above to package your extension the resulting Extension ID will be "gimgeafkohnmpdeopfnpankklbllicfn".
2. Create the extension manifest
Each extension requires a manifest file which defines important information for that extension, this file is then used by the browser and the Microsoft Edge Web Store for discoverability, installation & updates. For our simple scenario create a file called manifest.json and add the following json.
{
    "name": "Sample Microsoft Edge Extension",
    "version": "0.0.0.1",
    "manifest_version": 2,
    "description": "A Sample Microsoft Edge Extension.",
    "background": {
        "scripts": ["background.js"]
      },
    "content_security_policy": "default-src 'self'",
    "permissions": [
        "<all_urls>",
        "webRequest",
        "webRequestBlocking"
    ]
}
3. Add the JavaScript code
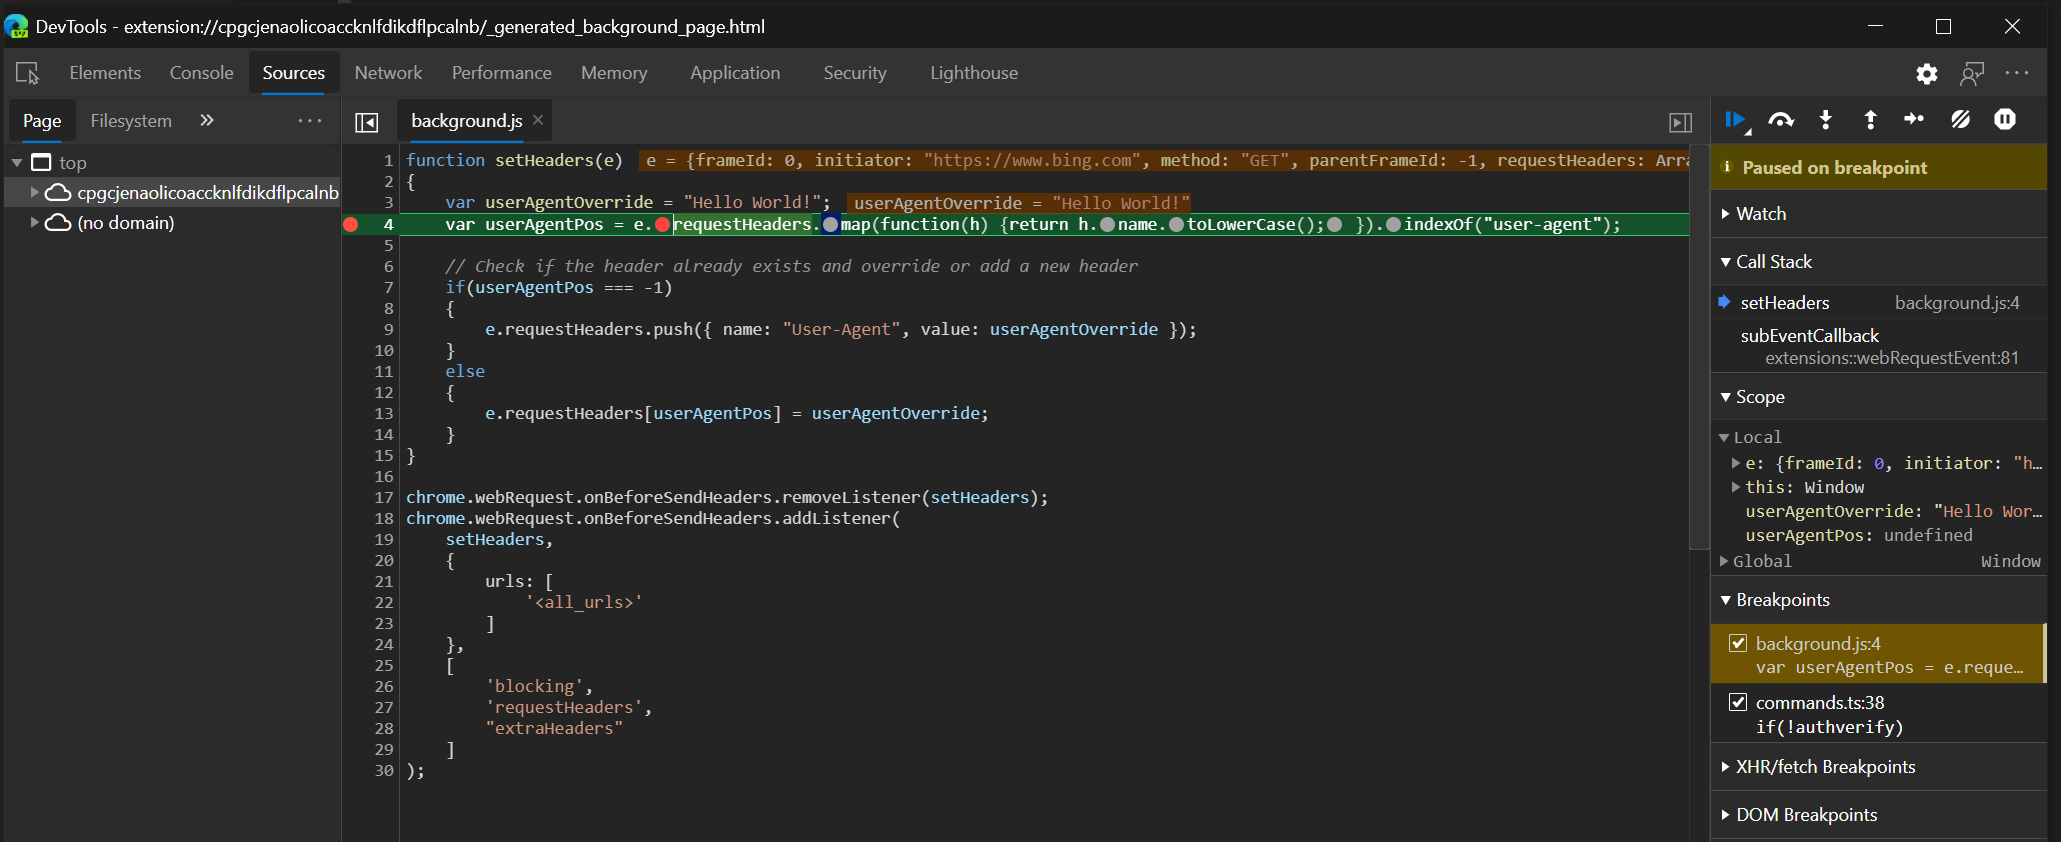
In this extension we will hook the browsers request pipeline and alter the HTTP Request Headers using the onBeforeSendHeaders event, in our manifest we also specified the required permissions upfront which will allow us to do this. Create a file called background.js and add the following JavaScript code:
function setHeaders(e)
{
    var userAgentOverride = "Hello World!";
    var userAgentPos = e.requestHeaders.map(function(h) {return h.name.toLowerCase(); }).indexOf("user-agent");

    // Check if the header already exists and override or add a new header
    if(userAgentPos === -1)
    {
        e.requestHeaders.push({ name: "User-Agent", value: userAgentOverride });
    }
    else
    {
        e.requestHeaders[userAgentPos] = userAgentOverride;
    }
}

chrome.webRequest.onBeforeSendHeaders.removeListener(setHeaders);
chrome.webRequest.onBeforeSendHeaders.addListener(
    setHeaders,
    {
        urls: [
            '<all_urls>'
        ]
    },
    [
        'blocking',
        'requestHeaders',
        "extraHeaders"
    ]
);
4. Test the extension locally
For local testing, it's possible to side load your extension in Microsoft Edge, first enable "Developer Mode", once enabled navigate to "edge://extensions/" and select "Load unpacked". Select the folder which contains your extension manifest and source code.

You should see your extension listed under "Form other sources" section on the extensions page.

At this point in time, you have not signed the extension with your private key. While in development the Extension ID is a hash based on the extensions path. To debug the extension using the Developer Tools click on the "Background page" link.
5. Package for deployment
Once we are ready to deploy the extension, we can produce the deployment package (CRX) via the Browser's UI, from the Extensions page click "Pack extension".

Select the folder where you have placed the manifest & source code and select the private key.
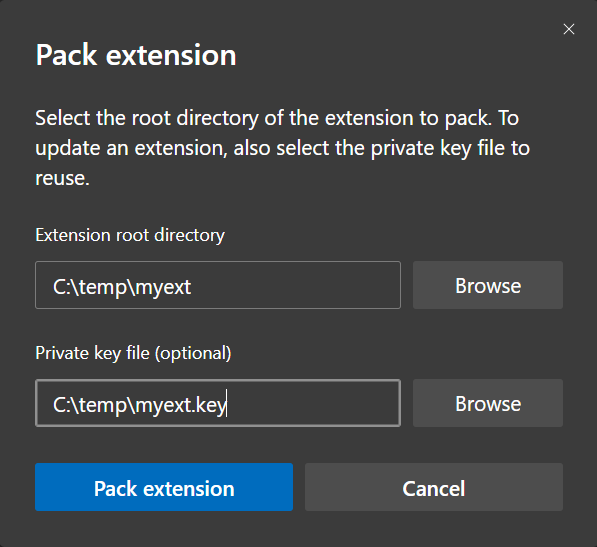
Click "Pack Extension", a CRX file will be placed in the parent directory in this case "c:\temp". We can also produce the package from the command-line leveraging the browser.
> cd "C:\Program Files (x86)\Microsoft\Edge\Application"
> .\msedge.exe --pack-extension=c:\temp\myext --pack-extension-key=c:\temp\key.pem
If you are not able to install a browser, for example on your build server, you could also try the CRX3 NPM module.
> npm install -g crx3
> crx3 -p key.pem myext/
CRX file created at "C:\temp\myext.crx"
Once we have the deployment package i.e. myext.crx, we can move on to the next section.
Distribution & Deployment
Depending on the scenario we have multiple options for distributing our custom extensions within the Enterprise.
- Self-Hosting - Self hosting requires us to host the relevant extension installation artifacts ourselves within our environment.
- Microsoft Edge Web Store - Another option is to allow Microsoft to manage the distribution of your extensions, but keep in mind that this would mean our extension would be hosted by the public store.
Self-Hosting
Self-hosting our installation artifacts allows us to keep everything on-premises, I would recommend this method if we wanted to ensure the source code does not leave our environment. Unfortunately, this option only provides basic tamper protection; depending on your use case this may present an issue for you as extensions are stored physically in the user's profile and these files are modifiable by the end user.
When the extension is deployed a file called computed_hashes.json is computed and placed in the extensions _metada folder.
{
  "file_hashes": [
    {
      "block_hashes": [],
      "block_size": 4096,
      "path": "background.js"
    }
  ],
  "version": 2
}
At runtime in the browser the computed hash verification logic performs the following when loading your extension:
- Verifies the hash of each file against the original hash generated at install time.
- Takes corrective action based on hash verification result, if a contents mismatch is detected by default the extension is disabled. If you are in the Enterprise and force installing the extension via policies, the extension is re-installed from source.
If we still choose the Self-Hosting option, we need to perform the following steps to enable this scenario:
- Enable automatic updates.
- Update extension manifest.
- Hosting
Let's look at each of these steps in more detail.
1. Enable automatic updates
To ensure the browser can check for updated versions of our extensions we need to host a file called the Update Manifest. Create a file called gupdate.xml and add the following XML contents - replace the placeholders with values specific to your extension. Note that you can have multiple <app/> elements for different extensions in the same update manifest.
<?xml version='1.0' encoding='UTF-8'?>
<gupdate xmlns='http://www.google.com/update2/response' protocol='2.0'>
  <app appid='<Extension Id>'>
    <updatecheck codebase='https://<Extension Download Url>/<ExtensionName>.crx' version='<Extension Version>' />
  </app>
</gupdate>
2. Update extension manifest
We need to ensure we update our extension manifest to include the update_url property, this will be used to evaluate whether there are updates for your extension. The URL must point to the XML file which we created in the previous step.
{
    "name": "Sample Microsoft Edge Extension",
    "version": "0.0.0.1",
    "manifest_version": 2,
    "description": "A Sample Microsoft Edge Extension.",
    "background": {
        "scripts": ["background.js"]
      },
    "content_security_policy": "default-src 'self'",
    "update_url": "https://<Extension Auto Update Url>/gupdate.xml",
    "permissions": [
        "<all_urls>",
        "webRequest",
        "webRequestBlocking"
    ]
}
3. Hosting
We can host the extension artifacts internally on any Web Server i.e. IIS, Apache etc, it's important that the clients can access this server at install time and that its accessible for extension updates. Ensure you place both the gupdate.xml file and your CRX file on this web server.
Microsoft Edge Web Store
You can follow the steps outlined in this article to publish your own extensions to the store. The web store is an interesting option for publishing enterprise extensions, firstly it's possible to control a published extensions visibility.
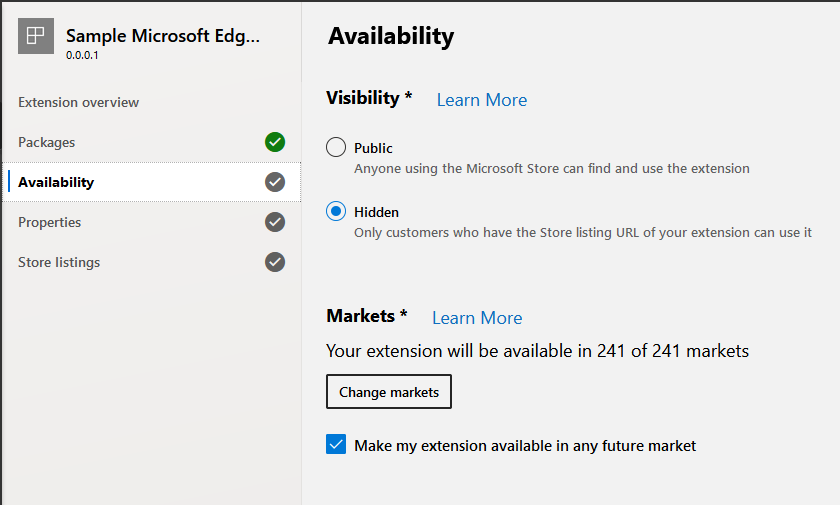
When publishing an extension we can set its visibility to "Hidden", with this option the extension is not discoverable via search. To use a hidden extension, you will need to know its URL this includes the extension id which is hard to guess.
"https://microsoftedge.microsoft.com/
addons/detail/gimgeafkohnmpdeopfnpankklbllicfn".
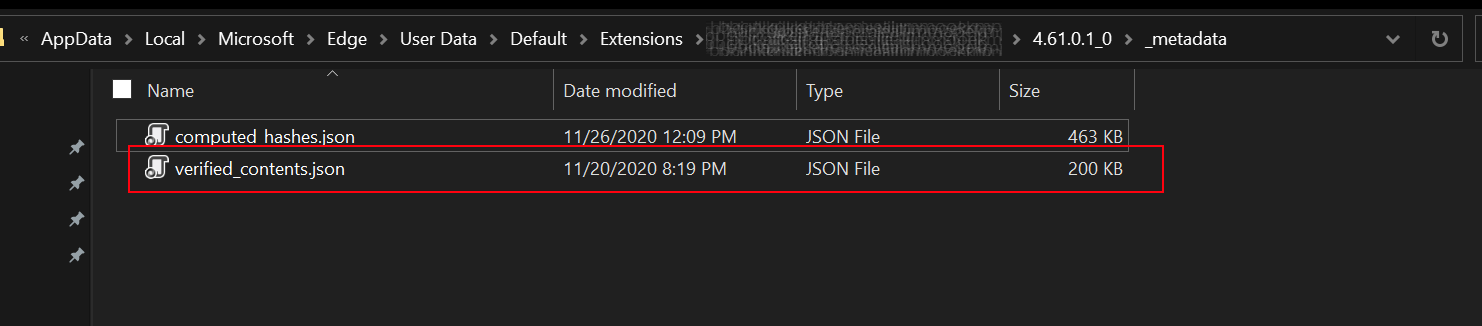
The second benefit of leveraging the web store is that it provides more advanced tamper protection, when publishing an extension via the store a file called verified_contents.json is placed in the extensions _metada folder
The structure of the file looks something like the following, it contains multiple signatures. The first is based on the Developers private key which is held by the store, the second (and the most important) is created using the Microsoft's web store private key and gives assurances that the files have not been tampered with:
[
  {
    "description": "treehash per file",
    "signed_content": {
      "payload": "",
      "signatures": [
        {
          "header": {
            "kid": "publisher"
          },
          "protected": "eyJhbGciOiJSUzI1NiJ9",
          "signature": ""
        },
        {
          "header": {
            "kid": "webstore"
          },
          "protected": "eyJhbGciOiJSUzI1NiJ9",
          "signature": ""
        }
      ]
    }
  }
]
The payload property contains the base64url encoded sha256
hashes of all the files in your extension package, a file called payload.json is used for generating the payload property value. The structure of this file when un-encoded looks like the following.
{
  "content_hashes": [
    {
      "block_size": 4096,
      "hash_block_size": 4096,
      "format": "treehash",
      "files": [
        {
          "path": "manifest.json",
          "root_hash": ""
        },
        {
          "path": "background.js",
          "root_hash": ""
        }
      ]
    }
  ],
  "item_id": "gimgeafkohnmpdeopfnpankklbllicfn",
  "item_version": "0.0.0.1"
}
At runtime in the browser the content verification logic performs the following when loading your extension:
- Check if verified_contents.json file has been deleted from disk, re-downloads original file from the store if required.
- Verifies each files signature with its actual signature based on the contents on disk.
- Takes corrective action based on signature verification result, if a contents mismatch is detected by default the extension is disabled. If you are in the Enterprise and force installing the extension via policies, the extension is re-installed from the store.
Managing a Clients Installed Extensions
If your clients are Active Directory joined, we can apply Group Policies to deploy your extensions, in the case where clients are managed by Intune, we have similar policies.
Let's take a brief look at some of these policies, open the Group Policy Management Editor, and go to Computer Configuration > Administrative Templates > Microsoft Edge. Select Extensions.
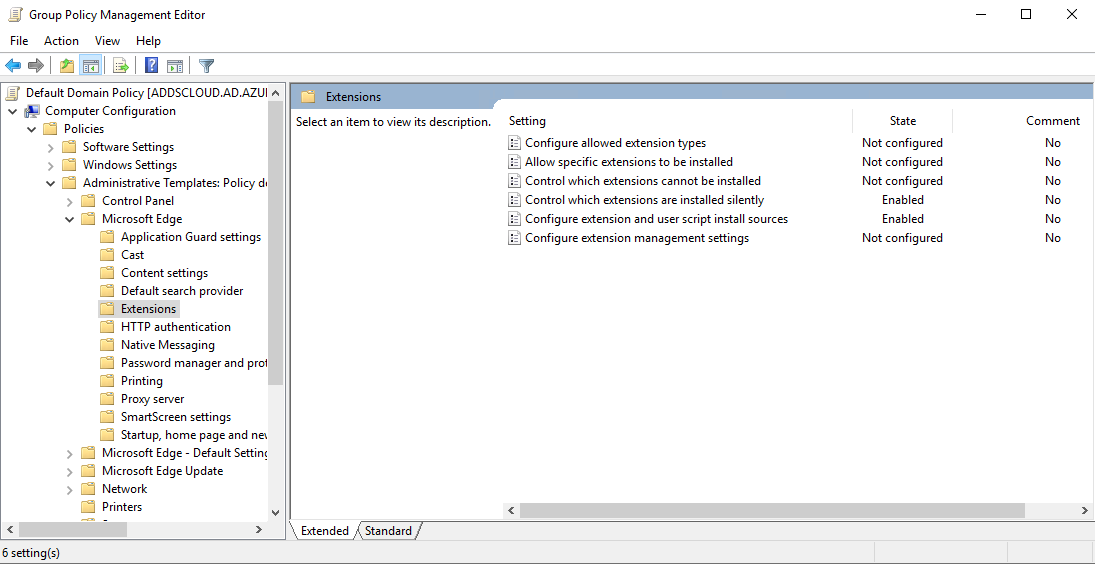
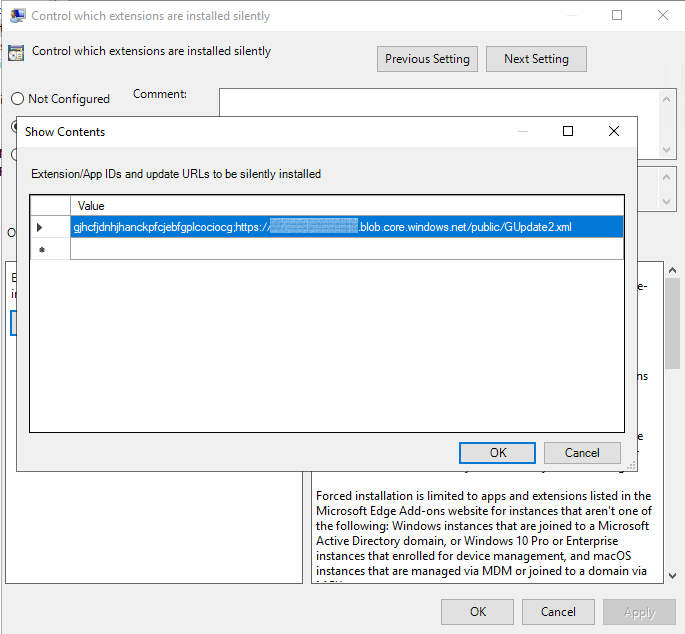
A common policy which is leveraged in the Enterprise is triggering a forced install of an extension using "ExtensionInstallForcelist".
Set this policy to specify a list of apps and extensions that install silently, without user interaction. Users can't uninstall or turn off this setting. Permissions are granted implicitly, including the enterprise.deviceAttributes and enterprise.platformKeys extension APIs. Note: These 2 APIs aren't available to apps and extensions that aren't force-installed.
If you are self-hosting you would add and entry like the following:
<Extension ID>;https://<Extension Auto Update Url>/gupdate.xml
In the case where you are leveraging the web store it would look like the following:
<Web Store Extension ID>;https://extensionwebstorebase.edgesv.net/v1/crx
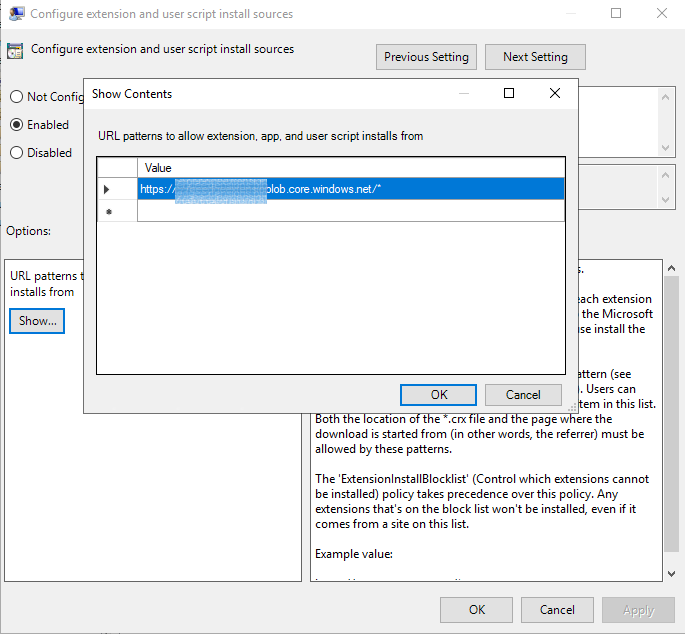
If you are self-hosting for extension distribution in addition to the policy above you will need set "ExtensionInstallSources" to effectively white list the url where your extension packages are being hosted.
Define URLs that can install extensions and themes.
Add an entry which looks something like the following, this should be based on the URL where your deployment packages are hosted.
https://<Extension Auto Update Url>/*
Another policy which can be applied in conjunction to the one above is "DeveloperToolsAvailability".
If you set this policy to 'DeveloperToolsDisallowed
ForForceInstalledExtensions' (the default), users can access the developer tools and the JavaScript console in general, but not in the context of extensions installed by enterprise policy.
If left with the default configuration, users should not be able to leverage the browsers developer tools to alter extension functionality.
I hope you enjoyed this post; we went from building & packaging our extension all the way through to distribution & deployment. I am sure that others will find the information useful!